August -Sept. 2011

AUGUST 2011 (continued)
Well, this build is certainly all it's CRACKED up to be! Here are some pics of the damage which was a result of not putting in cardboard to keep the brick chips out from around the oven expansion joint for the floor. The soldiers were spaced 1/8" away from the floor for thermal expansion of the hearth. Without putting in cardboard or other burnable material, solid, nonburnable and damaging material fell into the space and with the thermal expansion of the hearth, something had to give! It was the dome! Here are some pics of the cracks (more like fissure) in the dome.


This doesn't look as bad in pics as in person!Here are some more pics from the outside......

And now the grandaddy of all cracks! Yep that is me foolishly thinking I could fit inside to repair the cracks...well fitting in is easier than getting out!!!! HELP!!!!
Ok ok help me out of here... my shoulders are stuck! 
Now you know my wife is taking this pic and laughing her butt off and making all kinds of requests before she gets help!

All is well that ends well, the cracks are repaired and cured. Now it is time to finish the oven cure and test this puppy out with some PIZZA! (Hmmm, I wonder why I got stuck?)


Here is the form work for the travertine landing in front of the oven. Needed to build up this area to match the elevation created by the insulating foamglas under the oven.


Here you can see I angled the self towards the front for water or other liquids to run away from the oven and not into it. First non level surface to date! I added the travertine shelf after the concrete cured and now to Pizza!


FIRE oh YES!


Oven temps are approaching 800 degrees F


It's looking like PIZZA Time!
Where does the pizza go??? Dean do you know?
You can hear Dean Martin singing - " When the moon hits your eye like a big pizza pie, That's Amore' "
Finally PIZZA! Looking good enough to eat!


Pizza Party Time!  YAHOO!!!!!!!!

Now back to Building! Yeah right, how can I stop eating and start building again???
Is that my wife I hear? 
Oh, oh I need to get building! 
See you in September!


SEPTEMBER 2011 (continued)


September 2011 brings a chill to the air and a sense of urgency to the project. Now that the oven is functional and dry, it is a good idea to keep it dry!

So insulation on the oven, walls around the oven and a roof over the oven are the next steps in this journey!


    Here I am all cozy in my make shift hazmat suit. This insulation is super heat resistant and alsoworse than fiberglass insulation. I have a total of four blankets and will use it all.
That will give me a total of six inches of 8lb high heat insulation on and around the dome.  


Tada! Dome is all wrapped in its blankey and ready for a nap!


Now on to the walls!

July-August 2011

July 2011
Well it is starting to take shape and things are going along slowly to say the least! Now the work begins on the vent area, outer arch, chimney, etc.. Now I know that this is all running together, but so is this stage of the build. Besides the heat and aches in my back, my stomach is GROWLING for PIZZA!
Here is my rendition of a terracotta funnel flue thingy.  I guess the principal is to funnel the smoke and gases into the flue. I used some homebrew high heat mortar for "gluing" the two pieces together. 

Here is the outer arch area assembled, almost. Notice the arch bricks in the center do not have any mortar. They are self supporting, which is the theory behind the entire dome. Theoretically speaking it does not need mortar to stand. I used plenty of mortar btw! Now I need to make a flat, level platform for my flue and chimney to rest upon.


Well things are moving along on this blog way faster then they did in real life. It is now the end of July, and with the flue going up I can almost smell the pizza. Now as the mortar cures on the firebrick I need to add a thermal break for the chimney. 


I am thinking of using the foamglas for this but am worried about it supporting all the weight of the cement block, flue and bricks. So I did a test, as crude as it maybe, it gave me piece of mind. Notice the column to the right, it is on foamglas and I kept a keen eye on the level and height until I was satisfied it would hold the weight!

Here is the foamglas on top of the vent and around the flue. Now back to the facade and pavers.


Here are the design changes and seat of the pants plans for the front bricks!


August 2011 
So another month has gone by without pizza! My wife is starting a WFOwidow.org web site or is it the wood fired oven lost husband club? Not quite sure but her patience is being tested for sure!  Over a year and NO PIZZA!  oh well back to the grindstone.... Things are taking shape so to speak, although I feel like I solve one hurdle and create two more to jump. I am getting anxious for a fire and pizza but I have to do two things first, finish the flue and manufacture an insulated fireproof door. Here is my attempt at the door-


The door is made up of steel plate which I will paint with heat resistant paint (BBQ grill black) a two inch piece of foamglas is sandwiched in between the steel and an outer shell of Ipe wood from the left over decking wood. I will add a handle and thermometer later on as I have time. (right)


An update on the door - I did add a handle in the middle and a thermometer from forno bravo store which gives me the air temp of the oven. I have several thermocouple for brick temps.


Oh Boy! I think it is time for 
FIRE!


Yahoo! We have smoke and fire and it is all staying inside the oven/chimney!
Happy Dance Time!


Well that was one short happy dance I'll tell you! As I finished the second curing fire I noticed a crack in the rear soldier bricks! OMG! Well it wasn't too big and with consults from the wfo group I pressed on with the third fire, thinking this was just my poor mortar job in the beginning. WRONG!!!!! Here is a pic, that is worth a thousand cusses!
To be Continued.....

June -2011

Still No Pizza! 
Not even close as a matter of fact!

Seventh Course Arch Transition
Why aren't we even close? Well it has to do with the hired help, as in we don't have any! LOL This month is starting to get warm and my stomach is aching for some pizza, so back to work it is! After figuring out the arch/dome transition with the play dough, the rest of this build should not be so perplexing. After all how hard could the rest of the build be???? (I had no idea!)


Look no Play Dough! :)
Well some progress has been made after the arch transition was figured out and completed. Now it is onward and upward with the rest of the dome.


  Things seem to be working out for the most part. I am finally getting the hang of mixing the mortar to a good working consistency. It helped to do a lot of mortar mixing for the side brickwork, I needed the experience!


Trying to carefully align firebricks to avoid the dreaded teardrop effect at over the arch area!  Using the indispensable tool is a help in this area. You can see my temporary brick supports made from scrap lumber to hold the bricks in place while the mortar sets.


 Keeping an eye on the vertical joints from aligning to help prevent a long crack. Wish I wasn't so sloppy, hope it doesn't come back to bite me later in the build.


Had to remove the overhead protection since I was hitting my head on it as I was placing the higher courses. Things are moving along at a decent clip, I may be finished before 12/2012. Yeah 18 months should be enough time! 
 JULY 2011 - the saga continues! 

May - June 2011 Brick Oven Folly

May 2011 Where is the PIZZA???????????????????


Here we are in May and the weather is cold and damp! Yuk! But the build must go ON! Here we found a couple of pieces of travertine that the architect says will go well with the oven as a loading shelf and side shelves. Just needed to measure to make sure the pieces will fit nicely!


Oh my Goodness, if it isn't the lazy laborer! He stuck in the foamglas while we were sleeping! Using a sand/fireclay mixture under the foamglas, the foamglas was placed and leveled. And now he is mixing some heatstop 50 to put a skim coat over the foamglas for durability. There is some concern on the thermal expansion/contraction process wearing away the foamglas.


The Heatstop-50 will give it a nice hard surface on which to slide without wear. This coating will go on the foamglas and under the sand/fireclay mixture. All of these will be under the foamglas, both layers are really thin.


Now to lay out the hearth on the patio floor so that a herring bone pattern can be made and firebricks can be hand picked for a smooth floor. Bricks were marked roughly using a template and numbered for moving them onto the foamglas. Kinda paint by numbers system, only using firebricks! :)


Ok so I need to use the numbers to get all the bricks into their proper position. I am just trying to keep a flat level hearth so the peel doesn't catch on an edge and ruin a Pizza! It is a little time consuming to make sure there isn't any firebrick dust or chips on the sides so that they fit snugly together.


The foamglas is down and now to skim coat it with some heatstop50 for a wear surface.


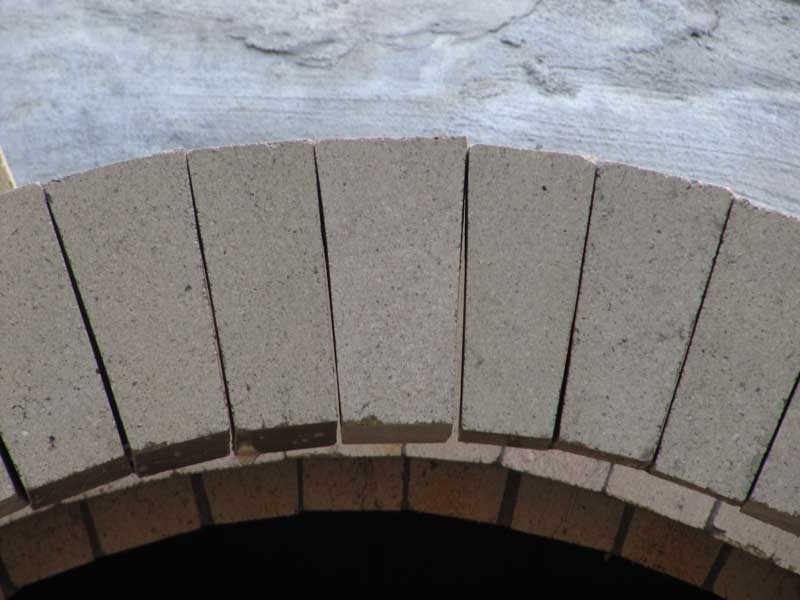
Finally some hearth bricks and first course trials. Still not sure about the soldier course or starting with half bricks. I don't want to have a mortar joint level with the hearth and so I am leaning towards the soldier course to start the dome.


As you can see I opted for the soldier course with a 18 degree bevel on top to start the curvature of the dome. I am still wrestling with the arch and opening details. Working with brick and mortar, once you start down a path, it is very difficult to change, very unforgiving.


After much consternation and researching prior builds, I have decided on using this set up as my oven opening/arch base.  The 2x4 is an idea brorrowed from Dino's build to keep a 20" opening straight and square.


Top View


Add now it is time to play in the mud! Finally some construction is taking place. The architect was beginning to wonder why I had the mortar, since I hadn't used any as of yet! I tried to keep the front joints as tight as possible. Why? I am not sure, except everyone on the brick oven site says so! :)


Well if nothing else it will be one level oven!

I'll finish the soldier course and see you all in June. I hope this rainy weather breaks so that more work can be done!

JUNE 2011 - 
Rain rain go away! Still no PIZZA!


I had to put up a canopy to be able to do any work this Month! And boy did I tackle the wrong part of this oven, The inner arch and Dome transition!!!!


Builders before me fore warmed of the possible marital problems that arise out of this area of the build! Pizza Bob commented his wife said it took him three days to cut one firebrick! OMG!


Well here are a couple of pics of my attempt at an inner arch (roman style) I needed an odd number of bricks so that one centers itself in the middle as the keystone.


With the opening I needed to span and the height, it worked out to be my lucky number 13 for the number of bricks in the arch! Yikes! This can't be good, my lovely (and VERY superstitious) Wife adds to the obvious. But 13 has been a lucky number for me and that is my story, and I sticking to it! The shims are to simulate the mortar that will eventually stick it all together!


Now I cut the birds mouth into the side supporting bricks and I'm getting ready to mortar the arch into place. Of course using that handy, dandy wooden arch template that got me out of the mason's hat and back into a more comfortable carpenters hat!


Ahh, a mortared inner arch entrance, now will it collapse or hold on its old time tested design????


Top, left side view of arch. I know it ain't the collseum!  Hey but an arch is an arch!And it is Standing (or is that arching) on its own!


Yippee!!!!!!!!!!!!!!!!!!!!!!!!!!!!!!!!!!!!!!!!!

Now for the dome transition parts! Sometimes thing go right and all is obvious even to an asthecically and mechanically blind bat like myself. Well the dome transition did not fall into that category! I looked at many other builds and how others handled this dilemma, and the only thing I found was I should have beveled the arch bricks  on the inside. To try and grasp this simple concept I started cutting some bricks and trying different approaches, NONE worked!
 So I sat down with a ice cold tea and had a small flashback to my youth. (Now that was a long trip to say the least, going wayyyyyyyyyy back in time to the 1960's) Anyway I asked the architect if stores still sold play-dough, she looked at me like the mortar in my head cracked! Play-Dough??? she asked?  I told her I needed it for the oven. She asked if I was going to use part from an easy bake oven too! Ok, I know I deserved that comment, but at the store we were checking out with the play dough and a young cashier (maybe 18yrs old at best) looked at the play dough and looked at us and smiled. Just then my wife pipes in that we were going to use mom's cookie cutters if we promised not to get the play dough in the carpet! She just busted up laughing and  told us not to get into trouble!


Ok here is what & How I used the play-dough. I molded it into a square shape that was very close to a 4" x 4" brick.


Just another dough boy story!


I then pushed that into place where I needed a brick and then had an impression to use as a brick cutting guide.


That is how I came even remotely close to getting the correct cuts on the dome transition bricks!