Sept. - Oct. 2011 The end is near?????? Or John's Brick oven - The never ending story!
September 2011 (continued)
Mid-September 2011, brings a chill to the air and a sense of urgency to the project. I will only have so many days to work on the project and now that the dome is completed and insulated, it needs to be protected from the snow and winter rains! So here I go learning to use steel studs and tin snipes, metal cutting tools and a million screws. (or so it seemed)!
But first I need to rewind to a bit earlier in the build and look at the 2" thick marble shelf we got onto the side of the oven.


Here is Nick and son Dean, without their help I would still be scratching my head and asking how the heck is this going to get from the truck to the stand! Thanks guys!
ok, ok , lets see...where the heck was I? oh yeah, my wife's' favorite part- working with steel studs! (She was so disappointed when she found out I wasn't having a bunch of guys over to pick up the oven, but instead it was the metal framing I was talking about, not a couple of studs resembling steel!

I pre-fab the walls first and put them up one side at a time. These were relatively easy to work with. Gloves are a MUST for this work!,

Now I need to pre-fab the roof trusses and set them on top of the walls and I will be well on my way to getting a roof on! I also have to continue the chimney block and start chimney brick work as well. Have a fire warming up the oven for some Pizza Tonight!


Roof trusses are up and things are going well for a change. Unfortunately that usually means I am doing something wrong! I made the oven roof pitch the same as the roof on the main house. Figured it would match and handle the snow as well as the house has for the past years.
 I am standing on the steel wall and it is passing the snow load test! Finishing up the cross braces and supports for the sheathing. I am using durock for sheathing as I am not comfortable using anything flamable over an oven that can get to temperatures in excess of 1000 degrees F Ok I admit I am chicken!
 Now it looks like he knows what he is doing, but we all know that ain't so!

August -Sept. 2011
AUGUST 2011 (continued)
Well, this build is certainly all it's CRACKED up to be! Here are some pics of the damage which was a result of not putting in cardboard to keep the brick chips out from around the oven expansion joint for the floor. The soldiers were spaced 1/8" away from the floor for thermal expansion of the hearth. Without putting in cardboard or other burnable material, solid, nonburnable and damaging material fell into the space and with the thermal expansion of the hearth, something had to give! It was the dome! Here are some pics of the cracks (more like fissure) in the dome.


 This doesn't look as bad in pics as in person!Here are some more pics from the outside......
And now the grandaddy of all cracks! Yep that is me foolishly thinking I could fit inside to repair the cracks...well fitting in is easier than getting out!!!! HELP!!!!

Ok ok help me out of here... my shoulders are stuck!
Now you know my wife is taking this pic and laughing her butt off and making all kinds of requests before she gets help!
All is well that ends well, the cracks are repaired and cured. Now it is time to finish the oven cure and test this puppy out with some PIZZA! (Hmmm, I wonder why I got stuck?)


Here is the form work for the travertine landing in front of the oven. Needed to build up this area to match the elevation created by the insulating foamglas under the oven.


Here is the form work for the travertine landing in front of the oven. Needed to build up this area to match the elevation created by the insulating foamglas under the oven.


Here you can see I angled the self towards the front for water or other liquids to run away from the oven and not into it. First non level surface to date! I added the travertine shelf after the concrete cured and now to Pizza!
FIRE oh YES!


Oven temps are approaching 800 degrees F
It's looking like PIZZA Time!

 |
| Where does the pizza go??? Dean do you know? |
You can hear Dean Martin singing - " When the moon hits your eye like a big pizza pie, That's Amore' "
 |
| Finally PIZZA! Looking good enough to eat! |


Pizza Party Time! YAHOO!!!!!!!!
Now back to Building! Yeah right, how can I stop eating and start building again???
Is that my wife I hear?
Oh, oh I need to get building!
See you in September!
SEPTEMBER 2011 (continued)
September 2011 brings a chill to the air and a sense of urgency to the project. Now that the oven is functional and dry, it is a good idea to keep it dry!


Here I am all cozy in my make shift hazmat suit. This insulation is super heat resistant and alsoworse than fiberglass insulation. I have a total of four blankets and will use it all.
That will give me a total of six inches of 8lb high heat insulation on and around the dome.


Tada! Dome is all wrapped in its blankey and ready for a nap!
Now on to the walls!
July-August 2011
July 2011

Well it is starting to take shape and things are going along slowly to say the least! Now the work begins on the vent area, outer arch, chimney, etc.. Now I know that this is all running together, but so is this stage of the build. Besides the heat and aches in my back, my stomach is GROWLING for PIZZA!
Here is my rendition of a terracotta funnel flue thingy. I guess the principal is to funnel the smoke and gases into the flue. I used some homebrew high heat mortar for "gluing" the two pieces together.

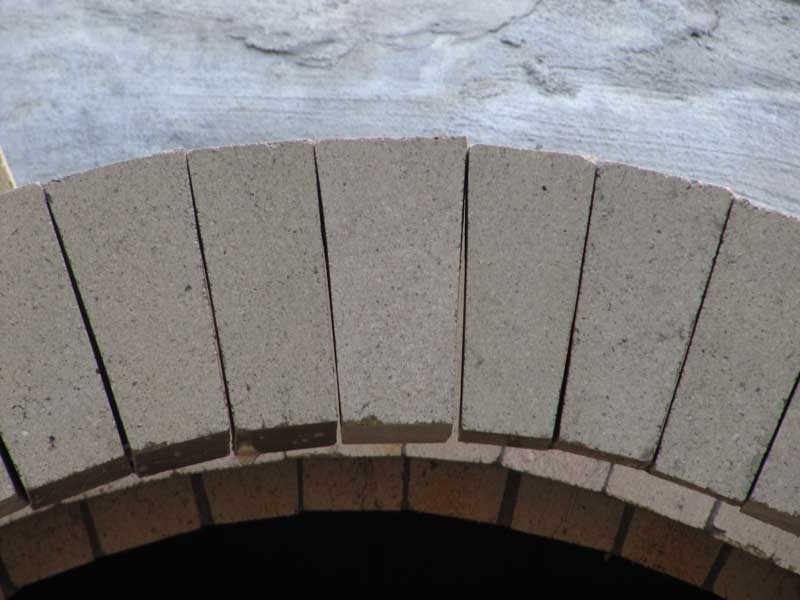 Here is the outer arch area assembled, almost. Notice the arch bricks in the center do not have any mortar. They are self supporting, which is the theory behind the entire dome. Theoretically speaking it does not need mortar to stand. I used plenty of mortar btw! Now I need to make a flat, level platform for my flue and chimney to rest upon.

 Well things are moving along on this blog way faster then they did in real life. It is now the end of July, and with the flue going up I can almost smell the pizza. Now as the mortar cures on the firebrick I need to add a thermal break for the chimney.
 I am thinking of using the foamglas for this but am worried about it supporting all the weight of the cement block, flue and bricks. So I did a test, as crude as it maybe, it gave me piece of mind. Notice the column to the right, it is on foamglas and I kept a keen eye on the level and height until I was satisfied it would hold the weight!


Here is the foamglas on top of the vent and around the flue. Now back to the facade and pavers.


Here are the design changes and seat of the pants plans for the front bricks!
August 2011
So another month has gone by without pizza! My wife is starting a WFOwidow.org web site or is it the wood fired oven lost husband club? Not quite sure but her patience is being tested for sure! Over a year and NO PIZZA! oh well back to the grindstone.... Things are taking shape so to speak, although I feel like I solve one hurdle and create two more to jump. I am getting anxious for a fire and pizza but I have to do two things first, finish the flue and manufacture an insulated fireproof door. Here is my attempt at the door-


The door is made up of steel plate which I will paint with heat resistant paint (BBQ grill black) a two inch piece of foamglas is sandwiched in between the steel and an outer shell of Ipe wood from the left over decking wood. I will add a handle and thermometer later on as I have time. (right)
An update on the door - I did add a handle in the middle and a thermometer from forno bravo store which gives me the air temp of the oven. I have several thermocouple for brick temps.


Oh Boy! I think it is time for
FIRE!


Yahoo! We have smoke and fire and it is all staying inside the oven/chimney!
Happy Dance Time!

Well that was one short happy dance I'll tell you! As I finished the second curing fire I noticed a crack in the rear soldier bricks! OMG! Well it wasn't too big and with consults from the wfo group I pressed on with the third fire, thinking this was just my poor mortar job in the beginning. WRONG!!!!! Here is a pic, that is worth a thousand cusses!
To be Continued.....
Subscribe to:
Posts (Atom)